How to classify, describe and analyze images using GPT-4o vision
GPT-4o is - as of time of this writing - one of the best multimodal models on the market.
Multimodal in this context means, it can work with multiple different input formats. Text, Images and soon also audio.
In this post we want to explore the vision part of GPT-4o. More specifically, we'll:
- Look at how to actually use images with the OpenAI API and GPT-4o
- How to label and categorize images, without first needing to train a image labelling model
- How to simply describe an image
- and finally, how to do some open-ended image analyses - with a little data analytics sprinkled on top of it
How to use the GPT-4o vision capabilities
Using GPT-4o's vision capabilities is quite straight forward - arguably very similar to how to use it's well-known chat completion capabilities.
Similar to chat completion, vision requires us to create
a messages-array, containing an optional system message as well as
a user message. Furthermore, you can also add "assistant"-messages as part
of the chat history or as part of your few-shot prompting
strategy. The
content-field of the user message then can contain not only text, but
also image data.
The image needs to be provided as a downloadable url or as base64-encoded image data. Let's look at an example in python:
Using GPT-4o vision with image url
First, let's look at how to create our prompt message array using an image link. Just upload the image to a public web host, and add this url as shown below.
Using GPT-4o vision with base64-encoded image data
If your image resides on your host, read the image file and encode it
in base64 format. Again, use the image_url field, but this time with
image base64 data.
Note: Make sure to change the jpeg modifier in the example below
to your actual file type.
Using GPT-4o vision with multiple images
Just as a side note: GPT-4o can not only work with one image per prompt,
but multiple. Simply add an additional object of type image_url to
your user message. You can even mix base64 and url-type images.
Note: Make sure to have a recent version of the OpenAI python package to follow this example. Version 1.40.0 or above is sufficient.
After that, it's as simple as using the OpenAI SDKs or OpenAI API to use the model. Let's finish our simple python example:
As simple as that:
- Create the messages-array as shown above
- Use the OpenAI API or SDKs to send the image to GPT-4o - combined with a prompt of your choosing.
- Get LLM-created results back - according to your prompt
About the image format
In general, you can put any image with any resolution and any format into your prompt - and GPT-4o (as well as the image pipeline in front of GPT-4o) will make the best out of it. However, for cost and latency management purposes, OpenAI provides two different image detail modes - or actually three:
low: The low-res mode. The image will automatically be sampled down to 512x512 pixels. The image will cost the equivalent of 85 tokens. This mode is fast and quite cost efficient.high: High resolution mode will first also sample down the image to 512x512 pixels and show the LLM this low-res version (so that it can get an overview about the image). Then, it will get detailed crops (cut-outs) of the original image - with 512x512 pixels each. Each one of them costs 170 tokens. Therefore, this takes quite significantly longer than for thelowmode.auto: The default. This mode will look at the size of the original image and depending on it's outline will either usehighorlow.
Note: If you need very detailed analyses of your images, you might
opt for the high res option. However, keep in mind that the details
are fed to the LLM with 512x512 pixel crops of your original image. So
if your details are larger than 512x512 pixels, they will not be
presented correctly. Quite contrary, in such cases, make sure to either
manually downsample the image so that your details are 'small enough',
or simply use the low res version.
To set the appropriate mode, add and additional detail key to the
image_url object in your messages array:
Image classification with GPT-4o
Image classification used to be quite a time-consuming process: First, you needed to select an image classification model, than you needed to create a dataset of at least 100 or so training data, containing the exact image categories you want to classify later on. Then, decide on a training strategy, execute the training, validate the result, host your model and then, only then, you could use the image classifier model.
This whole process is more or less obsolete with models like GPT-4o. These models are incredibly good in Zero-Shot classification-meaning you don't need to train them for a specific task, but they can predict a class that wasn't seen by the model during training.
For image classification, this means, we can simply send an image to the model, ask them to classify it based on some categories we provide, and we'll probably get a very good classification result - without ever needing to worry about model training.
We found, that this works best, if you shortly describe the classification
task in the system message as well as add the pool of categories you
want to classify also to the system message.
In the user message, simply add the image.
Note: There are some use-cases where you still might create your own image classifier - namely when you want to classify very specific niches. Eg. if you want to classify different types of mushrooms, you better create your own, specialized model. GPT-4o and the likes are able to correctly identify more generalized things, like different animal types (rather than eg. breeds of one animal class).
Example time:
Describing images using GPT-4o vision
Another very common task is to use the LLM to describe the image. The most
important aspect here is to be precise on what aspect of the image you
want to be described - as images might have various angles to describe on.
Again, it's best to use the system - message to provide the definition
of what exactly you want to have described.
An example for describing an image might be to store the image in a database and use the descriptions to search for it.
The example-output was
The incredible thing here is: If you find this description too detailed, or has too little details, or you want a different style of description, you might simply change the system prompt. That's the really powerful aspect here - you have a full-blown LLM with all it's prompt understanding. On top of that, they now can also read and understand images.
You might even use Few-shot prompting or similar prompting techniques.
Light data analytics using GPT-4o vision
Ok, we've seen that we can use GPT-4o to understand images, create descriptions and labels and that we can use simple prompting techniques to define, how the response should look like.
Now let's try something more elaborate: Many thousands of data analysts have created beautiful dashboards with potentially very helpful insights. However, time and time again it was shown, that not a single soul is looking at this poor, beautiful dashboards. (I can make fun of that fact as I was one of these data analysts...)
Now, as we've to acknowledge that most people are apparently too busy to look at these analytics results, what if we make AI look at our dashboards? (And yes, I'm aware that this all sounds a little desperate :-) ).
The strategy is simple: We create a screenshot of one of our dashboards, send it to GPT-4o to analyze and ask specific questions about it. On real-world example could be to create sort of an open-ended alerting system. The LLM should analyze a dashboard with data over time, and notify only when something out of ordinary happens.
In our case, let's see, whether GPT-4o makes a good dashboard-analyst by asking for a written summary of a specific dashboard.
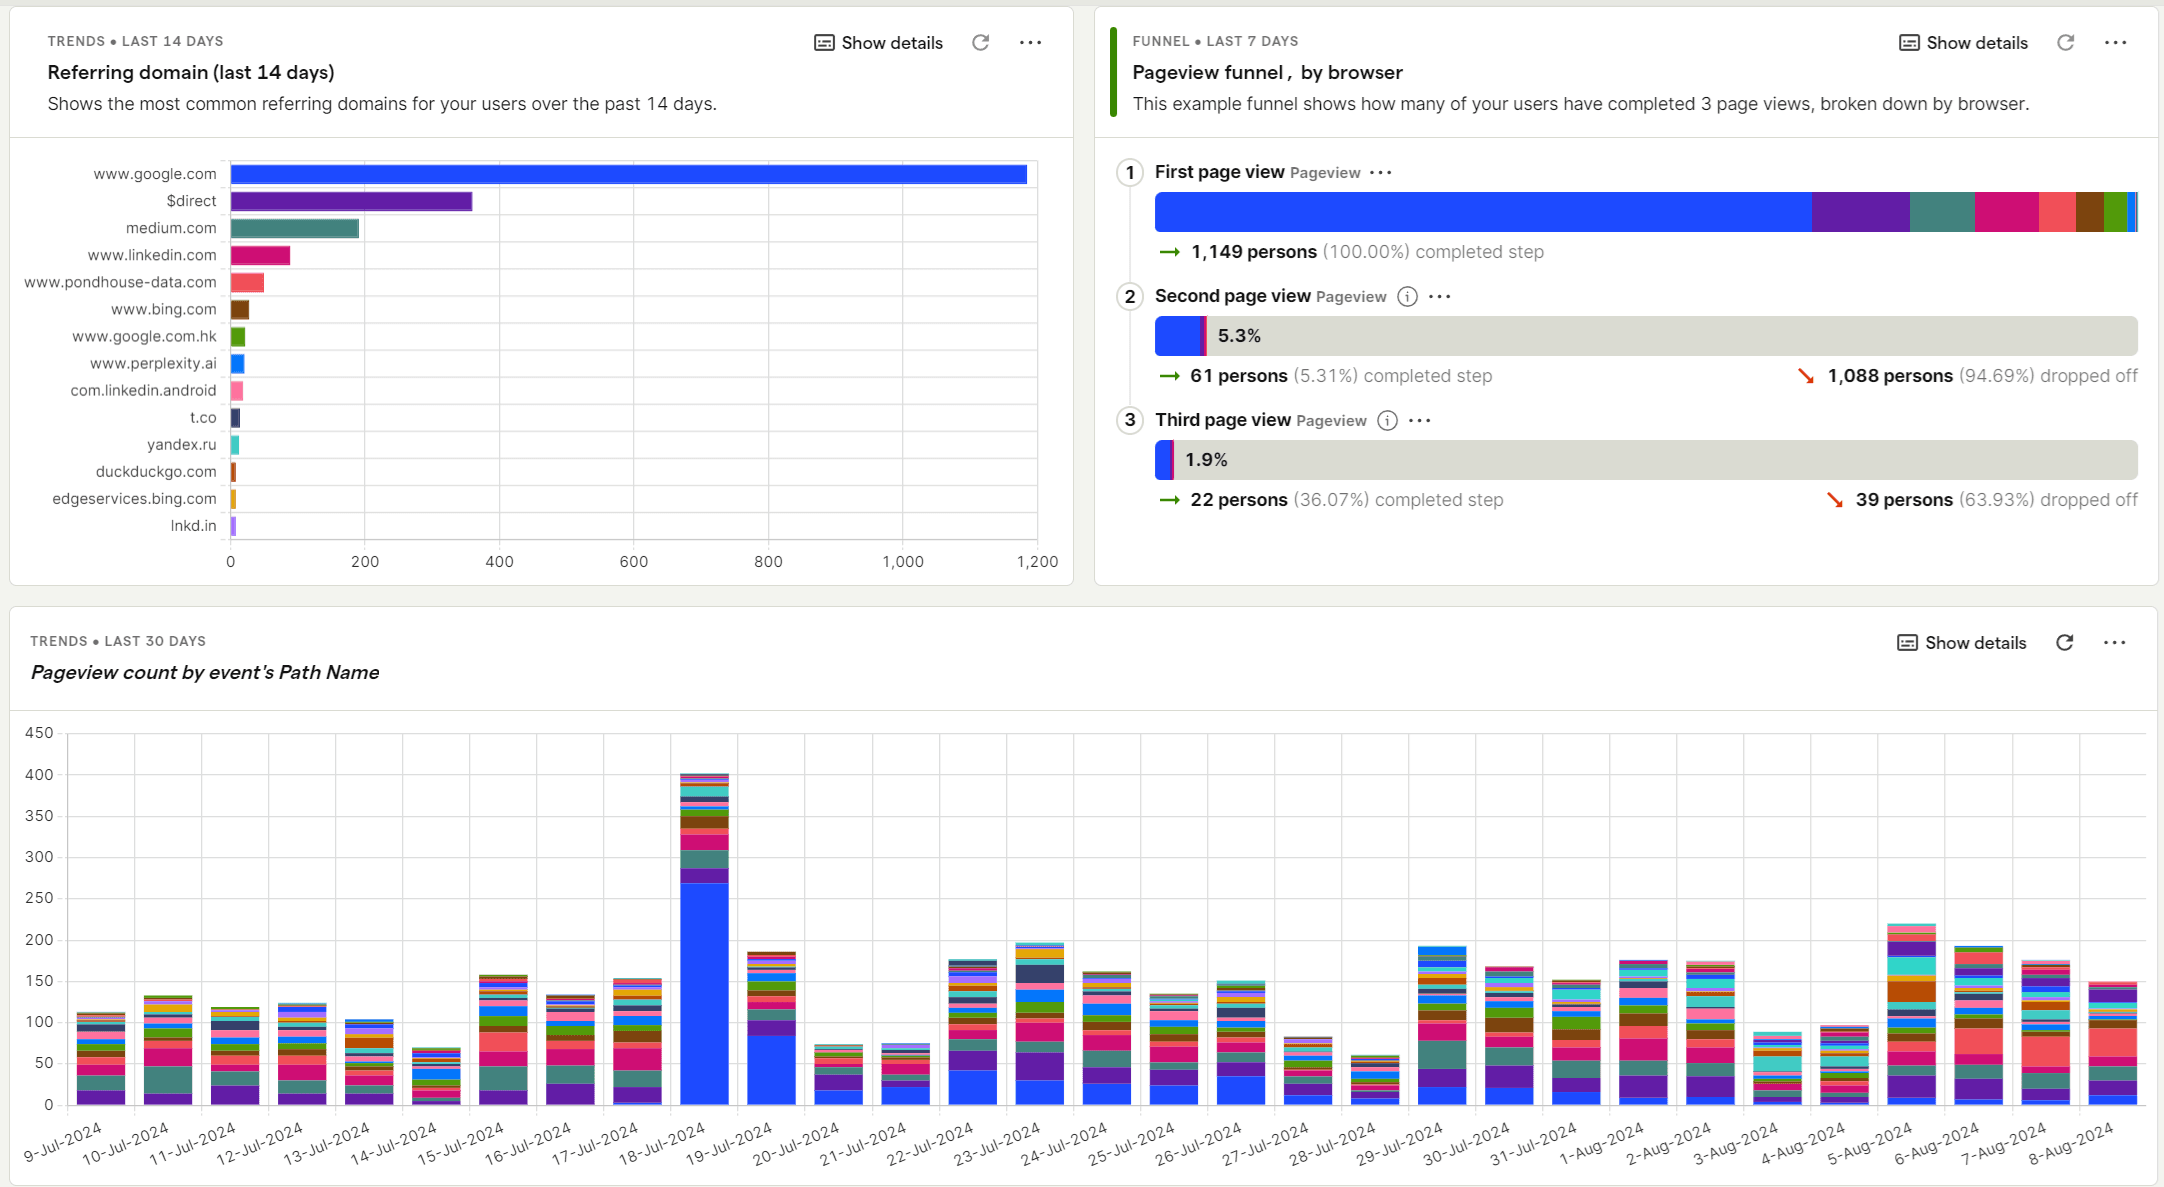 Dashboard we want to analyze
-
Install the
pytest-playwrightpackage. Its Playwright for python. (Playwright allows to navigate to web-pages and, among other things, create screenshot of them). -
Automatically create a screenshot of your dashboard.
In this example we assume the dashboard is openly available. If your dashboard needs authentication, have a look at the playwright documentation.
-
Use the screenshot for GPT-4o vision inference:
This was the response from the LLM:
Wow, this is actually quite amazing - considering that we simply threw a dashboard at the model and asked it to write a summary! I'm especially amazed at how well the model was able to read the charts and find the correct dates (eg. the spike of 400 pageviews on July, 18th).
Costs and pricing of GPT-4o vision for image prompts
That's all nice and good, but how much does it cost? Well, it's quite cheap
we'd say. The following prices are for the newly release GPT-4o variant
gpt-4o-2024-08-06:
- Any image in
lowresolution mode: 0.02 cents ($0.000213) or 2$ per 10.000 images. - 1920 x 1080 in
highresolution mode: 0.28 cents ($0.002763) or 2.76$ per 1.000 images.
Important note: This newly release gpt-4o-2024-08-06 model is the cheapest model of the GPT-4o series in terms of vision capabilities. Even the otherwise quite cost efficient gpt-4o-mini model is approx. twice as expensive - with worse output quality. So stick with this model at least for now.
Conclusion
In conclusion, the vision capabilities of GPT-4o open up an array of possibilities for image classification, description, and analysis. This tool eliminates the need for specialized training and complex setups, allowing users to better, easier and more economically combine AI and image data.
By integrating GPT-4o into your workflow, you can save time, reduce costs, and achieve high-quality outputs that were previously time-consuming and resource-intensive. The versatility of GPT-4o, from handling single images to analyzing quite complex dashboards, demonstrates its potential to change how we interact with and interpret visual data. Especially this last part - analyzing visual image data - is very intriguing.
With its user-friendly implementation and cost-effective pricing, GPT-4o is accessible to a broad range of users, from developers to data analysts. This guide has provided you with the foundational knowledge to start utilizing GPT-4o's vision capabilities. We encourage you to experiment with different prompts and applications, to get the best for your use case.
Further reading
- How to fine-tune GPT-4o mini (for free until September 2024)
- Chat with your confluence using LLMs
- How to fine-tune your very own LLM
Interested in building high-quality AI agent systems?
We prepared a comprehensive guide based on cutting-edge research for how to build robust, reliable AI agent systems that actually work in production. This guide covers:
- Understanding the 14 systematic failure modes in multi-agent systems
- Evidence-based best practices for agent design
- Structured communication protocols and verification mechanisms